
Table of Contents
Links
Videos: Intro Tutorials
Jackpot Shots
Card Notes and Info
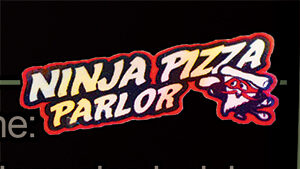
Intro to Pizza Toppings
Videos: Tutorials
Videos: System-J Explained Tutorials
Strategy: Octopus
Strategy: Notes on Hurry Ups
Pinball Skills
Strategy: Choosing a Turtle
Strategy: Choosing a Turtle Based on your Starting Toppings (Toppings Strategy)
Strategy: Ranking the Toppings
Strategy: Episode Grades
Exploit: SuperFly
Strategy: Tournament (in Standard Mode)
Video: Tournament Play
Strategy: Tournament (in Competition Mode)
Gameplay Videos (and Custom Code demonstrations)
Bug: Neutrino Pizza Party
Setting Up Your Game
(Possible) Bug: I Want a Body (was Exploit, but since has been fixed)
Links
Rules:
Tilt Forums Rulesheet:
http://tiltforums.com/t/stern-tmnt-rulesheet/6599
Best place to get full rules. The below guide is meant to be a supplement to great work people put into the TiltForums rulesheet.
Tutorial:
Kinetisist “Turtle Power…”
Rule explanation and TMNT strategy from Noah Crable.

Stern Official Rulesheet
https://sternpinball.com/wp-content/uploads/2020/06/TMNT-Rulesheet.pdf
Official Stern pdf–lacking in depth but well presented.
Pintips TMNT (Says LE but seems to be for all versions):
https://pintips.net/games/2315
Great place for quick tips if you don’t have the patience or time. …but disregard the dated Octopus tip. 😉 (My opinion of the octopus value)
Other Links:
Stern official TMNT page
Videos: Intro Tutorials
Note: Great for learning the basics and watching a master control the ball.
(using v1.54, as of May’23 v1.55 seems like only bug fixes)
See intermediate to advanced videos here
Jackpot Shots
TMNT is a very Multiball focused game. For this reason the first thing to do is to get yourself acquainted with the Jackpot shots and lingo:

Mondo Jackpot Shot=Loop shot for upper flipper
Grande Jackpot Shot=Behind the upper flipper (you unusually need to raise the left flipper to shot behind it–can be forehanded and backhanded (“rolling backhand”) but both are tough shots.)
You often will here a Turtle callout saying “Jackpot”. Don’t walk away thinking you’ve won the game yet, this usually means you’ve hit one of the 2 pizza targets for the very low scoring (I believe around 100k) Jackpots. Surprisingly low for a “jackpot”.
The Mondo Jackpot is lit with enough blue shot hits in NPMB (the Parlor), or green shots in TPMB (Right Ramp). It’s lit and can be hit 3 times progressively (although can time out–see info on Marshmallows for specifics).
Grande is lit after Mondo is hit at least once. Grande is reset after being redeemed. Grande does not reset Mondo, but I believe you have to hit another white Mondo to re-light it.

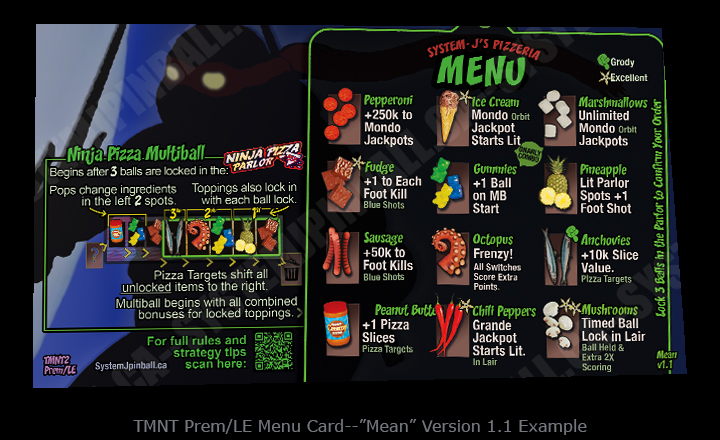
TMNT v2 Card Notes and Info:
Other info I wish I had space on the cards to explain further (and some explanations of the decisions I made on the cards):
*IMPORTANT (for beginners)*
What’s that insert hidden behind all that stuff? Oh, it’s just one of the most lucrative shots in the game. Pay attention to this light. When it’s lit during multiball, hit it. …if you like points that is. (and yes, it’s dumb that one of the most important inserts in the game is half hidden. But now that you know, it can be to your benefit in competition).

Octopus: Why doesn’t Octopus have a ninja star (recommended “excellent” topping) on the mean cards?: It’s been NERFED since v1.5 and is underpowered now instead of what many saw as overpowered before. See “Myth of the Octopus” box later in this page for further explanation.
Should I go for that Hurry Up that the music changed for the game seems to be making a big deal about? …Nope. Most Hurry Up’s in TMNT have a low value and are somewhat risky. Well, maybe instead of “nope” I should say probably not. See “On Hurry Ups” for more info.

What’s the reasoning between what topping are “Excellent” and “Bogus” on the Mean cards?:
The 3 starred toppings (on the Pro) are the most efficient toppings to get you to Mondo and Grande Jackpots. The Mushrooms on the Premium are just crazy powerful–especially if you have a feel for the shot.
The one green thumbs down topping, Anchovies, are very undervalued, always dangerous shots that you are often trying to avoid (pizza targets), and doesn’t have any other perks (PB was also a contender, but it at least can get you closer to an extra ball).
Most Valuable Shots (in my opinion (score only, not incl. benifits–completely unscientific list–all values without any multipliers)):
1. Final Battle start (immediate bonus of all episode scores).
2. NPMB Grande Jackpot (starts around 2mil.)
3. NPMB Mondo (starts around 1m? – repeatable–also raises value of mondos and grandes)
4. Episode final shots after TUMB (2-4m)
5. Nuetrino Pizza Party collect shots ( (exact value needed)? – can be more lucrative than above shots but also much riskier)
6. TUMB rescue shots (1m?)
7. TPMB Grande (starts at 1m)
8. First 4 episode end shots (starts at 1m)
9. April HU (starts low (around 300k) but very lucrative (750k-2m) with other events and later in game before any multipliers).
10.. TPMB Mondo (starts around 500k)
11. Foot123 final shot (starts at 300k but raises with foot spinner value that builds through the game. Can be lucrative in ball 3.)
12. Weapon HU final shot (500k but can increase through mystery awards. I’ve gotten a couple mil on a Weapon HU, but it’s rare).
13. Krang final shot (max 500k)
Marshmallows: “Unlimited Jackpots” means unlimited Mondo jackpots but only before it times out. So when you hit your first Mondo jackpot it starts a short timer. You then have time to hit the same loop for a ‘double’, then ‘triple’, then it turns off–you have to hit the Grande then re-light Mondo through Foot (blue) shots. This is where the Marshmallow comes in, the Mondo doesn’t turn off after the triple. You can hit it again and again until the timer runs out (I’m not sure of the timer length, or if it shortens). Potentially looping this repeatedly can give you higher scores than you thought were possible on this game. No easy feat though. (I’ve done is with the glass off to test this and it is quite surprising what the jackpots rise to).

Marshmallows Continued:
This is why I have “Gnarly Combo” on the “Mean” cards. The Marshmallow paired with the Ice Cream means the Mondo is lit at the beginning of NPMB; the gummy bear (1 is enough) gives you an extra ball at the beginning of the MB which means you have essentially free ball save time to loop.
As always in this game, try to have 2X running (or at least ready) before you start the NPMB.
Intro to Pizza Toppings
Get to know the Pizza Toppings:
The Ninja Pizza Multiball is the most lucrative state in the game. The Toppings that you choose (or maybe you feel they are chosen for you) are very important to how you should strategize how to get the most out of it.
The Topping info in game, is mostly seen a the top right corner of the LCD. Here, you have 8 boxes with randomly picked (unless in tournament mode) Toppings. Check out the video below to to see how you change and lock in the Toppings.
The video below ranges from intro to intermediate strategy on the Toppings system:
Also see “Ranking the Toppings” section later in this guide for a write-up on each Topping perks and how I value each one.
Videos: Tutorials (Intermediate+)
(This is from an earlier build of the game, but still good for learning alternate strategies, especially how to use Donatello)
Note: More RayDay awesomeness. Great to learn some intermediate rules
I have more tutorials in the “System-J Explained” section that break down and focus on specific parts of the TMNT code. Including dedicated videos on each the Ninja Pizza Multiball and Turtle Power Multiball.
Raymond Davidson (if you don’t know, is one of the best pinball players in the world and works for Stern as a (rules?) designer), has 5 videos up of him learning TMNT as he goes. All are great if you are trying to learn the game more in depth:
https://www.youtube.com/@raydaypinball/search?query=tmnt
More Vids:
Dead Flip :Beating Stern’s Teenage Mutant Ninja Turtles Pinball! (YouTube)
Jack Danger killing it on an earlier code before Octopus was Nerfed and NPP was moved to L1 training. Also to note, Jack is using IC maxed with Raph level perks saved.
Stern Pinball: The Making of Stern Teenage Mutant Ninja Turtles Pinball! (2020) (YouTube)
A promotional video. Nothing for strategy but a fun video where you can see some of decisions that when into making this awesome game.
Videos: System-J ‘Explained’ Tutorials
These video deconstruct important parts of the TMNT code:
On Ninja Pizza Multiball:
On Toppings:
On Turtle Power Multiball:
ON Hurry-Ups:
On Episodes and Team-Up:
See my YouTube Channel for Full List of videos.
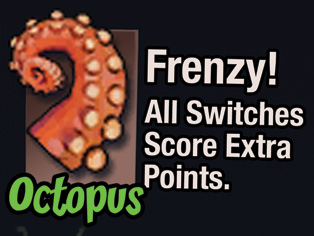
Strategy: Octopus
Myth of the Octopus:
Early in the TMNT code the Octopus was quite powerful. A bit overrated in my opinion, but still powerful. In Update 1.50 (Released Nov ’21) they NERFed the Frenzy to half or even more its value. In a solid long playing MB you’d be lucky to get 1-4mil now from the Frenzy (2-8 with 2X multiplier). For comparison, Ice Cream can get you 1mil in 2 shots (with a chance while the ball save is on), a Chili Pepper 2mil with 1 shot! (again, with the ball save on). The Octopus is still extra points though and I’d still choose it over 4 other toppings, but it’s not something I would risk changing the toppings since the NERFing. I often here people saying to make sure you have Octopus if you want a good score, hence why I say “Myth”. The Toppings are much more complicated than this though and worth looking into if you want a good score.
Strategy: Notes on Hurry Ups
In Short: Learn what the hurry-up are (see cards) and stay focused on your game plan instead of being distracted.
In Long:
Avoid the Hurry Ups (at least to start): The hurry-ups are under-valued and worth avoiding unless lit for something else at the same time. For instance, when Foot123 is lit, so can the right ramp to qualify episodes. It’s worth hitting the first shot then, BUT the loop and ramp are risky shots and I’ll avoid it if they are not lit for anything else (which is usually the case; It’s always tempting though and damn fun to do, so do it anyways 😉 , but remember, it’s not worth much at the beginning of the game. I’ll only go for loops & ramps if I’m ‘feeling’ the shot or the ball saver is on. That being said, due to the unforgiving geometry of the playfield, it may be worth going for the center ramp to get to the right flipper. But I wouldn’t advise sending it back up to the top flipper just to hit a hurry-up, only if it happens to be there and feels safer than letting it fly down to the top of your slings.)
All this said about the Hurry Ups, April and Foot123 *can* be lucrative later. Especially April where you can get Mystery Award to raise the base value accumulatively; with a good event and 2x it’s easy to get 3-4 million from one shot when it’s lit.’ This is why on the Advanced cards I found the April values worthy of the space. I find April HU is worth going for if started when a mode and multiball are going; I often find myself draining back to single ball with April HU active. If no mode is running, and especially if you have 2X going, I find it a lucrative shot. Especially if the ramp is also lit for mode qualifying.
The game will trick you into thinking every Hurry Up is the most important thing in the game. Don’t take this personally, the game’s job is to take you’re money as fast as it can. Even the original score card has Foot 123 as one of the 6(?) items to go for. Maybe they thought it would be more important when they released the game, but more often then not it is something to avoid. But it is fun and useful if you want to start so you can avoid TPMB for one shot when you need the right ramp to qualify an episode shot (Esp. using Don). Pretty risky going for that inlane, but fun.
Final note on Hurry Up’s:
The only time I focus on starting and finishing a hurry-up is if I’m close to Cowabunga (2nd wizard mode) and only need one more task completed.
To conclude: if you are focusing on score, avoid that Hurry Up unless you know it’s valuable and/or are confident with the shot.
General (but VERY important) Pinball Skills
If you want to reach a new level of pinball play: Watch Abe’s videos on pinball techniques and practice them:
Abe Flips Mastering Pinball Series (YouTube)
Note: TMNT is a tough game to post pass on. I suggest still sticking with it as getting the ball to the right flipper is very important. More often than not though, even a successful post past means you’ll still have to play of the fly (it’s hard to post pass and trap up).

Strategy: Choosing a Turtle
In Short: Choose Raph for getting to an episode faster, Don for getting a Multiball faster, Leo for getting 2X faster, and Mikey if you value the outlane ballsave.
In Long:
Raphael:
Let’s start with everyone’s favorite turtle, crazy ol’ Raph (everyone’s, right? Ok, maybe not you, but everyone else).
Choose Raph if: you want to start an episode quickly.
Raph spots the 2 ramps to start the game and his skill shot is on the left ramp. His training starts with one of the weakest perks (2X Krang combo) but the 3rd level is the most powerful (3X playfield multiplier (in place of the 2X) when running). Then progresses to 3X Episode for the 4th level which turns into an overpowered set of perks. Multipliers are compounded, therefore (if my math is right), during an episode with a 3X PF running that is 9X the episode scoring!! That means 9 to 40+ million for an episode. If you have a TMNT with InterConnect, it seems like a no brainer to focus on maxing out Raph and taking advantage of these multipliers.
Shots spotted with Raph: 2 (ramps)
Other things to think about when choosing Raph:
Depending on how the game is setup the ramps can be tough and dangerous to hit. If the game is too steep to backhand the ramps, I may lean towards picking Raph for the easy Episode start. It might not be a lot of extra points (even completed episodes to start the game are only worth around a million and a half). If the game is set up that hard, you may get a good score for the machine with that those extra points.

Leonardo (the Keener)
Choose Leo if: You want to get to 2X playfield multiplier or training quicker.
Leo is ready to get to training right off the bat. That means you are spotted 4 shots to start the game. This can be used to go for training earlier (and therefore a quick chance at Neutrino Pizza Party), or to get you closer to 2X playfield multiplier (training drops you back down to having to light it again before progress to 2X on your next ball).
Leo’s 2nd training perk, +10 seconds to episodes, is useful if you want the Team Up perks. It can also be a drawback though if you get a mode you don’t care for and would rather time out than take risky shots.
Leo’s skill shot is 1 of the 3 toughest shots in the game: In the Lair. If you get it, it also starts training though, which is kinda cool. In Team up, since you are playing Leo, the first turtle to save is Donatello (middle ramp), which is even tougher than the lair, so keep that in mind if Team Up progress is important to you.
Shots spotted with Raph: 4 (Lair Targets)

Donatello (the Geek)
Choose Donnie if: You want a quick multiball.
Donnie’s skill shot is the middle ramp. Like Leo, this means the skill shot is harder (but not worth any more).
Donnie’s main perk, benefit, and drawback is his ability to start a multiball (Turtle Power MB) with one shot to the right ramp. This can mean you can get some quick points and progress towards things like training, 2X PF multiplier, and outlane ball save. The drawback is it hard to stack with an episode. It’s still possible though: if you start foot123 (2nd left inlane) it turns off TPMB progress until it is over but still allows progress towards episodes. If you start foot123, it’s often ideal to hit the right ramp for the first foot shot. Then you are free to hit the left ramp (if still lit yellow), start an episode in the parlor, then hit the right ramp after foot123 has timed out to start the TP multiball during the mode.
Don’s L3 training is pretty powerful: +10 seconds to ball saves. Unfortunately in non-IC play this might take you most of your game trying to achieve. While playing IC though, a leveled up Donnie can give you a pretty nice safety net.
Shots spotted with Donnie: 4 (right ramp)
Michelangelo (the loveable airhead)
Choose Mikey if: You want the safety net of outlane ballsave to start.
Mikey starts with the outlane ball save lit. This should be a big perk on a game with brutal outlane drains (especially the left), but for some reason it seems like the weakest of the turtle perks. So much so that the code buffed Mikey to give him 5 pizza slices well after V1.0 to supposedly balance him out. But it still doesn’t quite seem enough as often a novice player is more likely to go for Don for the chance at a quick multiball.
His training L2 and L4 are very enticing. L2 is 2X April HU, one of the more lucrative and numerous hurry ups, and his L4 is 2X NPMB, the multiball that many players think the game is too heavily weighted too. His L3 perk is trash though as by the time you’ve gotten it (in non-IC play) you have most likely played past what it gives you a multiplier for: Pizza Eating Contest.
The L2 and L4 training perks, like the ball save, should in theory be powerful but in practice just seems to be weaker than the other character choices for some reason.
Shots spotted with Mikey: 10 (5 April Shots + 5 Pizza Targets)
Strategy: Choosing a Turtle Based on your Starting Toppings/
(Toppings Strategy)
You can pick a turtle based on their perks and the way you prefer to play the game. But I often find it fun (and sometimes lucrative) to choose your turtle based on the starting Toppings.
Raph: If the first 2 Toppings (the 2 on the far right) are good, and you want the chance to get to Team Up a little sooner, Raph is always a good choice. Even if the first Topping sucks (anchovy?) but the 2nd and 3rd Topping are good (lets say a gummy bear and an ice cream), I’ll pick Raph with the plan of advancing the Topping 1 to the right (where you may also want to see what Toppings you are advancing into a lock spot) while the ball save is going then go for the parlor lock shot (and plans always work out in in pinball, right?).
Drawback to Raph: It’s harder than other turtles to get 2X PF going for your first NPMB.
Leo: Since having Training lit to start the game, you are 4 shots closer to a playfield multiplier. I find Leo is a great choice if you like all (or most) of the starting Toppings and want a better chance at getting to NPMB, with the 2X AND less chance of changing the Toppings. I still find you will want to start a mode with your NPMB, but there is less urgency to hit the ramps. Say you like the first 4 Toppings, focus on 2 shots to the parlor to lock them in. Then go for the ramps, then the parlor to start a mode and your MB at the same time.
Drawback to Leo: There’s more pressure to do well on your first NPMB and as well it’s harder to get to Team Up (and therefore a 2nd NPMB) than Raph.
Donnie (shut up Donnie, …oh wait, wrong pop culture reference):
If you hate your starting Toppings, you may think of taking Donnie for the chance at changing them. You do this by hitting the right ramp to start TPMB then just bash those pizza targets. Huge risk of draining quicker than you want and only changing a few toppings, then you have the tough decision of taking the risk of hitting the dangerous pizza targets again before you start locking in the parlor. Especially since TPMB has a shorter ball save then NPMB and even though the points are less than NPMB, you can still rack up some points on the smaller Mondos and Grandes. The other benefit here is that you get an early feel for the multiball where other turtles won’t reach this muliball until after playing their first NPMB.
Drawback to Don: It’s much harder to start a mode (episodes) before going into TPMB. Therefore the modes, at least one, can seem harder to get through and a bit of a slog. Like Leo, it also seems to put a bit more pressure to have a good NPMB.
Mikey:
It’s harder to sell Mikey on any Toppings strategy. But if you like the first 2 Toppings, he’s not a bad choice since you will also be hitting the skill shot at the same time. Not a lot of points, but if you like the safety net of the outlane save to start (which is 5 shots otherwise), and like the first couple Toppings, you can have a good game with him.
Strategy: Ranking the Toppings
Since the scoring on TMNT is weighted to the Ninja Pizza Multiball, it’s worth paying attention to the topping you are about to lock in. Here’s my power ranking of the toppings (on the Pro) and a brief reasoning why:
In short: Take mushrooms, Ice Cream, Chili Peppers and Fudge when you see them. Nice to have 1 Gummy Bear (but more is excessive). Everything else is a bonus and have their own bonuses. Pay attention to them: Your Toppings will dictate the most lucrative way to play that NPMB.
In Long:
| Topping | Rationale |
|---|---|
| 1. Ice Cream | The best topping! Spots 5 foot soldiers to start the MB and lights Mondo JP. One hit to the orbit lights Grande JP and the orbit is still lit for up to 2 more shots. Even though not valuable as Grande, I put this as more valuable since it can be easier to hit, especially from the auto-launch. With ball save on, let your ball(s) drain for another chance at it. Pairs well with one (or more) Gummies which will allow you more chances at the orbit with the ball save on (while the pizza magnet is still active and holding your first 3 balls). |
| 2. Chili Peppers | The most valuable shot, but after hitting it you need to hit foot soldiers and Mondo to light again. Spots 6 shots to begin MB. |
| 3. Fudge | Gives you one more foot shot per hit per each locked Fudge. To explain Fudge, I have to explain how Foot Soldier hits work: Blue shots are not equal; the blue lit ramps are worth more. The left ramp is worth 3, the center ramp and the center ramp and loop are 2 each, and the loop and right ramp are 1. You need 5 foot soldiers to light Mondo. So, each fudge will give you an additional +1 foot soldier kill. Meaning you can get to the Mondos much quicker; for instance, if you have 2 fudge locked you can light Mondo with one shot to the left ramp (or 2 loops). Since the MB is so weighted to Mondo and Grande JP’s, I value fudge a lot. This and the Octopus are the most valuable persistent effects. In a long playing MB, this topping is more valuable than Ice Cream or Chili’s. |
| 4. Gummy Bears | Gummies can help in a few ways. Having at least one means you will have a ball in play while the pizza magnet is active. Having more can mean you might get more pop hits and therefore more chances at mystery awards. I usually like to have at least one going in, but having more works against you after the ball save is off. |
| 5. Octopus | Worth a few million on a half decent MB. Pairs well with Gummies since you are more likely (seemingly, just my eye test) to get balls into the pops. (This Topping was nerfed in an earlier code. Hence why you will still hear people say things like “just get the Octopus”. See Myth of the Octopus for more on this). |
| 6. Pineapple | Spots an extra Foot Soldier at the Parlour shot. Value of this topping can be worth more or less depending on how easy you find the shot (some tables you can get a lot of bricks). *Note: Parlour shot needs to be lit blue for this to spot extra Foot. You can have more than one Pineapple. 2 Pineapples = 3 Foot Soldiers at the Parlour, when lit. |
| 7. Marshmallows | It’s tough to rank the Toppings due to the strength of combinations. For instance Marshmallows can be way more valuable than “7”, but only if you have other Toppings. Marshmallows allow for unlimited Mondo JPs as long as it doesn’t time out. If you start with this, 1 plus Gummy Bear, and an Ice Cream, you can loop the Krang loop for HUGE points before the ball save ends. Like more than you can get from Grandes. Makes for a super fun task to try and do. Of coarse, like everything else in this game, easier said than done. But possibly the most epic (and overpowered WHEN you can do it) looping in any game. Essentially, this topping increases with value with the players ability, the easier you can loop the higher you should value this topping. …but without a quick way to get to the Mondo JP, say you don’t have Ice Cream or multiple Fudge/Pineapple locked in, this topping will be essentially worthless. |
| 8. Pepperoni | Adds value to Mondo jackpots. Can add up in a good MB. Not a topping I’d aim for, but far from the least valuable. |
| 9. Peanut Butter | This is a topping I’d like to do more testing on. I know this can help you in getting closer to the Pizza Slice Extra Ball, but I’m not sure how much bonus the pizza slices can be. Really though, it might only bump up this topping one up on my list since the dangerous nature of the targets makes it hard to make a good strategy out of these. Still though, useful for getting to an EB, which can be powerful in a non-tournament game. |
| 10. Sausage | Adds value to foot soldier kills. Can add up in a long playing MB. I can’t confirm, but I believe this doesn’t work in conjunction with the fudge. Meaning even though the fudge spots a foot soldier for purposes of advancing to Jackpots, it won’t give you the extra points of killing the foot soldier. |
| 11. Anchovies | I’m not sure why they have the value so low for this, but I don’t think there is a feasible strategy in this topping. If the value was 10X, maybe their could be a strategy with the Peanut Butter, but the inherent riskiness of the targets makes this topping a wammy Topping for me. It’s the only topping I often try to change away from, even given the riskiness of doing that as well. It is a persistent effect, but even in a long playing multiball you’d be lucky to get a few hundred thousand extra points. |
| *Premium (Mushrooms): | The same as the above but with Mushrooms at the top of the list and everything else pushed done a level. It’s a very powerful topping and worth going out of your way to get if available. The Lair shot can be tough, so try to get one in there before the ball save is off to start the multiball |
Strategy: Episode Grades For:
–Multiball Pairing
–Team-Up Perks
&
–Single Ball Play.
Night of the Mousers:
A+ for Multiball Stack: Almost completes itself. Best mode to stack with a multiball.
A+ for Team-Up Perk (Inlane spots bad guy): Worth trying to achieve before team-up. In one of Raymond Davidsons videos he seemed to think it was overpowered.
D for single ball play: It’s a tough mode to complete in single-ball mode. To the point of being frustrating because the Team-Up perk is so good.
Pizza-O-Meter:
A for Multiball stack
C– for Team-Up Perk (2X Pizza Party): Not useful unless you get to victory laps. Not an easy feat.
A for Single Ball Play: One of the more easier Modes; if you’re looking for a quick couple million, this episode is a good option. Also nice to get if you are far away from a multiball. You can hit the right ramp once to count as 1 shot to the episode and 1 shot progress towards TPMB.
Wrath of Krang:
A– for Multiball Stack: Even though the targets roam, you can get lucky and it mode completes without paying attention to the red arrows. Or, if you don’t hit the red targets you often seem to add time with the other shots.
A for Team-Up Perk (One foot kills all (foot soldiers, not Bebop and Rocksteady)
B for Single Ball Play: If you are good with ball control, this is one of the easier (and fun) modes to do.
Window Shopping:
C– for Multi-ball Play: I find it tough to hit the orbits in multiball—although, you can sometimes get a free shot from the auto launch to left orbit for some reason.
A for Team-Up Perk (Orbit shot spots both (Bebop and Rocksteady)): Quite useful and works very well with Wrath of Mousers perk, but it’s a tough mode to complete due to the orbits both being dangerous and tight shots.
C+ for single ball play: This mode keep the ball moving around the orbit. In my experience both orbits are dangerous to hit, and can be a bit unpredictable in speed (and therefore also trajectory) coming back to the flippers. But it still seems slightly easier in single ball play than multiball.
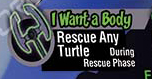
I Want a Body:
C- for Multiball stack: Tough to hit the ramps or the orbits during multi-ball. I often find I can time out the episode in a multiball.
A for Team-Up perk (Rescue Any): Great Perk to have, especially if you have another perk that helps you get to the rescue phases. Makes it easier to avoid having to hit the Don (center ramp) shot.
B+ for Single Ball Play: Easier mode to do in single ball play than multiball. Especially if you can backhand the ramps and have decent control skills. Also great for progressing towards TPMB if still available. Still risky (as pretty much everything in this game is without a ball save on).
See You on the Other Side Ray:
B+ for Multiball Stacking: The ramps are tough, but the Lair target is pretty easy in multiball. The episode time seems to be fairly generous and isn’t the hardest mode to stack.
D- for Team-Up perk (2X Rescue Hurry-Up): The Rescue value is so small (infuriatingly small for a timed shot where 2 of the 4 options are the toughest in the game) that 2X doesn’t add much. And if you don’t have perks to help you get there, you can forget it unless you have Top 500 skills.
B for Single Ball Play: If you can control and hit the ramps it’s not too tough of a mode, especially if you can backhand. Bonus: Can be a useful mode to upgrade the Lair (to Training to 2X) as 3 of the 6 shots are to the Lair mono-target.
Welcome to the Concrete Jungle:
D for Multiball Stacking: Tough mode to complete during multiball. It can help you get the Dimension X targets, but the left ramp can feel near impossible during multiball. It’s a short timed episode (possibly a bug since some shots don’t add any time (seems strange, especially the ramp shot that sends you to Dimension-X)–if you get to Dimension-X with lots of time, a multiball could help you finish the mode off quick though.
B for Team-Up Perk (+250k per Bad Guy): If you can grind in Team-Up this could be valuable. Could use it as a strategy where the pressure is taken off the rescue and takes a back seat to killing “bad guys”. With 2X going this could be quite lucrative even if you can’t hit the rescues in time.
C– for Single Ball Play: Because of it’s Team-Up perk, this mode can be very tempting even though it’s short and dangerous. The Dimension-X targets are dangerous. I often just go for the ramp 3 times. If I hit a target and survive, it’s a bonus. Another mode that benefits greatly if you can backhand the left ramp.
Super Fly:
B- for Multiball Stacking: Can work for you in MB, but the second shot (the left ramp or left orbit) can be harder in Multiball. The final shot (loop or center ramp), can somehow be qualified easy in MB, often through a ball triggering the loop randomly.
E for Team-Up Perk (2X Shredder): The Shredder value is ridiculously low (like 50k), 2 X (near) nothing is still (near) nothing.
B in Single Ball Mode: Really, It’s only 3 shots, and the toughest shot in single ball is the 3rd which sometimes can be qualified with a relatively easy shot to the Parlor (thanks to a bug).
Exploit: SuperFly
On SuperFly episode the 3rd shot (loop or center ramp) can be spotted instead at the parlor–but only if the parlor is lit for something else.
Still happens as of newest 2025 code.
Strategy: Tournament (in Standard Mode)
Note: I am far from one of the best tournament players (I hover around top 1000 IFPA) but here are my thoughts on TMNT in tournament play.
In short:
-avoid hurry up’s (at least early)
-focus on advancing towards multiballs
-pay attention to 2X pf multiplier and advance when last LAIR letter of either training or 2X (especially on ball 1 or 2)
-episodes: worth starting but more so for indirect bonuses than direct points (points range from 1.5 million to 9 million (with 2x) (4 episodes relights NPMB and TPMB; each episode relights LAIR and APRIL targets).
Avoid the Hurry Ups, at least at the beginning of the game: they are low scoring and often dangerous. Only go for if it’s stacked with something else you need like a ramp to start an episode. But some HU’s can be lucrative by ball 3 after increased value though mystery awards the spinner.
Focus on the multiballs and try to make some progress towards 2X playfield.
Many players think Ninja Pizza Multiball (NPMB) is so overpowered that everything else in the game is just secondary things to get through so you can get to another chance at NPMB; It’s hard to disagree with them. Jackpots range from 1 to 3.5 million each and raise through Mondos. I find on average NPMB can be 2 to 4 times more valuable than TPMB and even the Team Up Mini-wizard mode. The Ice Cream, Chili Peppers and Fudge help you get closer to those lucrative NPMB jackpots. One strategy is to even play the Turtle Power Multiball (TPMB (which has about half the jackpot values)) first just to practice getting those jackpot shots and get a feel for the game. That said, don’t underestimate the points from TPMB, it’s much easier to get to Mondo JP–since Grande is worth less, it can be more valuable to focus on Mondo double and triple before hitting the Grande.
All this said, I personally don’t think NPMB is so overpowered that it is not worth going for anything else. I often have very good scoring games (50+mil) while having disappointing NPMB’s. There are plenty of points elsewhere.
Tournament Strategy: Episodes
The episodes, although low scoring to start the game, they gain in value as you progress. You may think about timing one out if you are close to TeamUp and are not interest in the Team Up perk. Timing out can be tough on some episodes more than others.
More importantly, episodes refresh the lair and April targets. If you have already used a 2X and you are locked out, it is often worth starting a mode, to have another chance at re-lighting 2X (along with the outlane save if used already) for your next multiball.
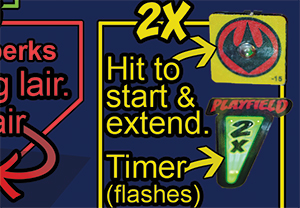
The 2X multiplier is import to have ready when going into something lucrative like NPMB. It’s lit from the Lair mono-target after training is lit. That means you need 8 risky shots to get it ready. After 2X times out, it can be lit again with 4 more shots as long as training is lit.
More notes on 2X:
1. You may find it useful to get training lit while the ball saver is on. Training caries over so you don’t have to start over at 8 shots as long as you qualify it.
2. The letters time out. If you are on the last letter it may be worth going for to qualify training or 2X.
3. Lit 2X also carries over as long as it has not been started yet.
4. Nuetrino Pizza Party (NPP) (lit after first progress of your training) can be lucrative but you have to weigh the option of loosing 4 shots to your next 2X. If you do go for Training, you may want to do it before something like TPMB which can be uses to work back to 2X again.
Quick Turtle Choices for Scoring:
Raph: lit episodes gets you closer to TUMB and therefore also a second chance at NPMB
Don: lit TPMB can mean you can use a MB to help you get closer to 2X. It can also be helpful to get use to the playfield and give you some practice at the Mondo and Grande Jackpots. Don is also useful if you don’t like your initial toppings and want to (randomly through MB hits) change them up before you start locking them in.
Mikey: The lit outlane ballsaver can save a ball for you on a tough playing game.
Leo: Lit training means 4 less shots to get to 2X.
It’s very important to note if the game is in Competition Mode. See next section if it is.
Video: Tournament Play
Strategy: Tournament (in Competition Mode)
Competition mode cuts out a lot of the randomness in the game making it more fair, less fun, but more fair.
On the Pro, the first 2 Toppings are octopus and fudge. Octopus can get you a few million. Fudge imo, is the most valuable topping since in competition mode Ice Cream, Chili Peppers, Marshmallows and Gummy Bears are removed. Fudge will help you get to Mondos and Grandes sooner.
In competition mode Octopus moves up in value as well. Even though the MB is capped at 3 balls to start, I find Octopus is still more valuable than anything other than fudge.
Peanut Butter is often useful to getting to an extra ball (EB). Any competition that doesn’t allow you to play the EB means this topping is worth less. You still can help increase your bonus with slices though, so I’d still rather have PB over anchovies though.
I don’t have any experience with the Premium in Comp. Mode. From videos I believe I saw that the Mushrooms are still available. If that is the case, they are by far the most powerful Topping choice.
Setting Up Your Game
(for home owners of TMNT)
The effects of playfield steepness:
The primary thing I look for on a TMNT I play for the first time, is if you can backhand the ramps. If you own a TMNT and can backhand the ramps but get more than 50% rejections (sometimes you can’t backhand the left ramp at all), I’d suggest lowering the pitch a bit and see if it helps. I believe the factory recommended pitch is 6.5 degrees (the bubble level near the trough should be in the middle). Now this isn’t as straight forward as ‘steeper is harder’, when you lower TMNT it seems that there can be more outlane drains.
More on steepness: If you are finding the game frustratingly hard, try changing the pitch down OR up to see how the game plays. It’s amazing how small changes can change the game feel. Remember to level the game (left/right) every time you change the pitch.
If you have the game pitch at 6.5 degrees (remember to measure from the playfield, not the glass) but still can’t backhand (backhanding is when you hit the shot on the same side that your flipper is on (eg. Right ramp from the right flipper), there are players out there who have changed the flipper bushings (intermediate pin repair skill needed, but anyone handy can figure it out) and have found that they can backhand now. Don’t just use any stern bushing though, there are ones out there designed to help with this specific issue (Here’s 2 options: “Updated Stern Nylon Flipper Bushing” from Pinball life, “Precision Flipper Shaft Bushings” from Precision Pinball Products Pinside Link –I have not used either of these and can’t personally recommend, buy and install at your own risk (I’m tempted to try the PL version, but I can backhand on my TMNT, even at a 7 degree pitch).
Before you change the bushing though, you could change the flipper strength in the setting to see if that helps. That too is a double-edged sword, though, as the faster the ball is launched, the faster it comes back.
Software Settings:
REDUCE THE KICKOUT POWER (if you want to save wear and tear on your trough): In the setting look for Feature Adjustment #11 (thanks @c4ffeineaddict on YouTube) ; you should lower it from well below the Factory Default (240)–mine is set for 160, for instance, but game to game, that number could be too low–the factory setting is overpowered and can unnecessarily wear down your trough prematurely.
Outlane Ball Save: The outlane ball save can be set so you can control which lane the ball-save is on when lit from the flippers (similar to Rush). I leave mine off (most of the time), but it is a very popular option to change.
Auto Ball-Save from Lair: If you get a lot of left outlane drains straight from the Lair, you can change a setting to have a short ball save to reduce the frustration. (I personally do something different that has helped with this problem (see De-“Borging” below).
Lair Release Ballsave:
By default, TMNT does not have a ball save after it is released from the Lair. Many games have an issue with the ball bouncing to the left outlane. If your game does this you might want to add a couple seconds to the “Feature Adjustment #27” in the game options.
Making the Left Outlane more Forgiving: “De-Borging”
You may have noticed that the left outlane can be BRUTAL on TMNT and the left post is NOT adjustable. John Borg, the designer of TMNT’s layout, is notorious for making double-inlanes (Metalica, Rush, GoTG, etc.) which has become a trademark of his designs; this can mean that you get bouncing in that area that seems to direct the ball to the left outlane. TMNT seems to be one of his more unforgiving games though due to the Lair and the un-adjustable posts. Players, mostly home use, have done a few different options to combat this, in hopes that their game be a little more forgiving (I personally like a hard game, but this gap is so wide that it’s nearly imposable to shimming a ball out, therefore I use the 3rd option myself below). Here are some options:
De-Borging Option 1: https://pinside.com/pinball/forum/topic/teenage-mutant-ninja-turtles-club2020-cowabunga-its-pizza-time/page/48#post-5797825
De-Borging Option 2: https://pinside.com/pinball/forum/topic/teenage-mutant-ninja-turtles-club2020-cowabunga-its-pizza-time/page/85#post-5914713
De-Borging Option 3: I personally had some extra white rubbers around (from restoring classic games) and decided to try a white rubber that was tight enough just to roll over the existing post and black rubber. Not only did this close the outlane gap enough to be able to shimmy out now, I found this to have a positive effect on the Lair feeds too: The Lair feeds now very rarely bounce to the outlane and I was even able to disable the Lair feed ballsave altogether. Here’s a couple pics of my setup (look for the white rubber):


Bug: Neutrino Pizza Party
During this mode don’t bother shooting into the lair (behind the lair mono-target on the left). It doesn’t seem to spot the shot even though it is lit. (still, as of April. 2025 :/ )
Exploit: (Now Bug): I Want a Body
As if of v1.54. (!!FIXED!! (sort of–see update at the end) AS OF v1.55-I’m leaving this here though as a record and it might be useful explanation of how the Perk works.)
-The “I Want a Body” TUMB perk says “Rescue Any”, instead it is rescuing all with one shot. Quick way to get a Cowabunga requirement.
Further Explanation:
It’s meant to work like this: After you defeat the foot soldiers (non-orbit , Beebop (left-orbit) and rocksteady (right-orbit) the game goes into the “rescue phase”. Here, without “I Want a Body”, one turtle will be lit starting with Leo (Lair)*1. Once you rescue a turtle it adds a ball (symbolizing a turtle(?)) and you start again. The perk*2 is intended to light all turtles who you are not playing and haven’t been rescued yet. You then have a choice of shot to rescue. Hopefully this gets fixed in the next big update*3 but until then you can use this to get an easy Cowabunga requirement*4–unfortunately at the expense of potential points and a fun mode. You also jump into Victory Laps immediately after rescuing one turtle.
*1 From memory I believe is goes in this order; Leo–Don–Raph–Mikey, where it skips the turtle you are.
*2 As of a conversation with Cory Stup (Programmer on TMNT)
*3 One of the main coders knows about it and also said it worked in an earlier code.
*4 Beating TUMB give you one automatically starting with April.
*update*: there still seems to be bug in this perk, unfortunately just a bug and not an exploit anymore. If you hit the Leo shot (in the lair, behind the flipper) it will seem to spot it, but then just stays lit and doesn’t add a ball or go back to the foot soldier shots to attempt another rescue. More testing needed to confirm though.
Big Points When You Start Final Battle.
One last tip, when you start Final Battle (FB) it gives you a bonus of you accumulated episode scores. 2X playfield multiplier applies to this as well. If you can, have 2X running when you his the left ramp to start FB. I’ve had bonuses of up to 60 million, which means having 2X running game me an extra 30mil for one shot! The risk/reward of starting 2x (if not already lit) might depend on how successful you remember playing them. If a lot of the episodes have a green border on the right of the LCD, you can expect the initial FB bonus to be big, and may be worth the extra shots to light 2x.
Last Updated: Dec. ’25 (Based on code 1.58)
Please email me via Contact page for any suggestions, corrections or links regarding this page.